Tuesday, December 8, 2015

Happy Rugelach


    I really don't know much about Hanukkah or any other Jewish holiday.  (I even have to check the spelling every time I type the word.)  But when you have friends who are Jewish or any other religion/nationality other than your own, it makes me want to learn more about all of it, especially any traditional food that might go along with a holiday or celebration.  And if the recipes are really tasty, then I want to get know it as much as humanly possible by immersing myself  in research and by research, you understand, this means cooking and eating.
     Our friends Molly and Dave (and their two young sons) are Jewish.  The nice thing is that they are quite tolerant of all of my questions, in particular the ones about recipes and dietary restrictions.  Another excellent thing about them is that they are game to try just about anything I concoct in my kitchen.  They are both incredibly willing and enthusiastic participants when it comes to my culinary experiments. 
     Considering it is Hanukkah, I have been trying to come up with an edible gift for them.  I already stashed away a jar of Bourbon Cherries for Molly.  If she doesn't want to share them with Dave, that's her business, not mine. Of course, the booze steeped cherries and not for children.  So, a baked item is definitely in order.  Since I am not familiar with traditional Hanukkah sweets, I googled it.  There were many delicious items. Some fussy, many deep fried and some that I just did not feel inspired to make.  Epicurious.com saved me with an article which caught my eye featuring a few recipes of rugelach.  Considering the dough is basic and it's up to the baker to decide on any number of filling options, I feel the possibilities to be just about endless and I am very likely to find something of use already in my pantry.  The best one out of the bunch looked to be by Dorie Greenspan.  She won me over first with her story about how this recipe became part of her repertoire long before she became a household name and an authority on home baking.  Indeed, according to her it is one of the first cookies she was able to master.  Anyway, I found the cookies from the recipe to be fantastic and everything you could want: crusty, sweet and a bit of crunch from the sugar on top.  After they sit for a day, they get a little softer from the jam filling.  (I used raspberry jam, mini chocolate chips, cinnamon and sugar for the filling, but you can choose whatever you like.)  As for Dave and Molly, I'm not sure if they ended up sharing the rugelach with their boys.  Perhaps they squirreled them away with the cherries to be enjoyed after children go to bed.  Late night cocktails and cookies?  Now that's my kind of celebration! 


Rugelach
Yield
Makes 32 cookies

Ingredients

  1. For the dough
    • 4 ounces cold cream cheese, cut into 4 pieces
    • 1 stick (8 tablespoons) cold unsalted butter, cut into 4 pieces
    • 1 cup all-purpose flour
    • 1/4 teaspoon salt
  2. For the filling
    • 2/3 cup seedless raspberry jam, apricot jam or marmalade
    • 2 tablespoons sugar
    • 1/2 teaspoon ground cinnamon
    • 1/4 cup chopped nuts (I prefer pecans, but you can use walnuts or almonds)
    • 1/4 cup plump, moist dried currants
    • 4 ounces bittersweet chocolate, finely chopped, or 2/3 cup store-bought mini chocolate chips
  3. For the glaze
    • 1 large egg
    • 1 teaspoon cold water
    • 2 tablespoons sugar, preferably decorating (coarse) sugar

Preparation

  1. To Make the Dough:
    1. Let the cream cheese and butter rest on the counter for 10 minutes-you want them to be slightly softened but still cool.
    2. Put the flour and salt in a food processor, scatter over the chunks of cream cheese and butter and pulse the machine 6 to 10 times. Then process, scraping down the sides of the bowl often, just until the dough forms large curds-don't work it so long that it forms a ball on the blade.
    3. Turn the dough out, gather it into a ball and divide it in half. Shape each half into a disk, wrap the disks in plastic wrap and refrigerate for at least 2 hours, or up to 1 day. (Wrapped airtight, the dough can be frozen for up to 1 month.)
  2. To Make the Filling:
    1. Heat the jam in a saucepan over low heat, or do this in a microwave oven, until it liquefies. Mix the sugar and cinnamon together.
    2. Line two baking sheets with parchment or silicone mats. (Silicone baking mats are great for rugelach.)
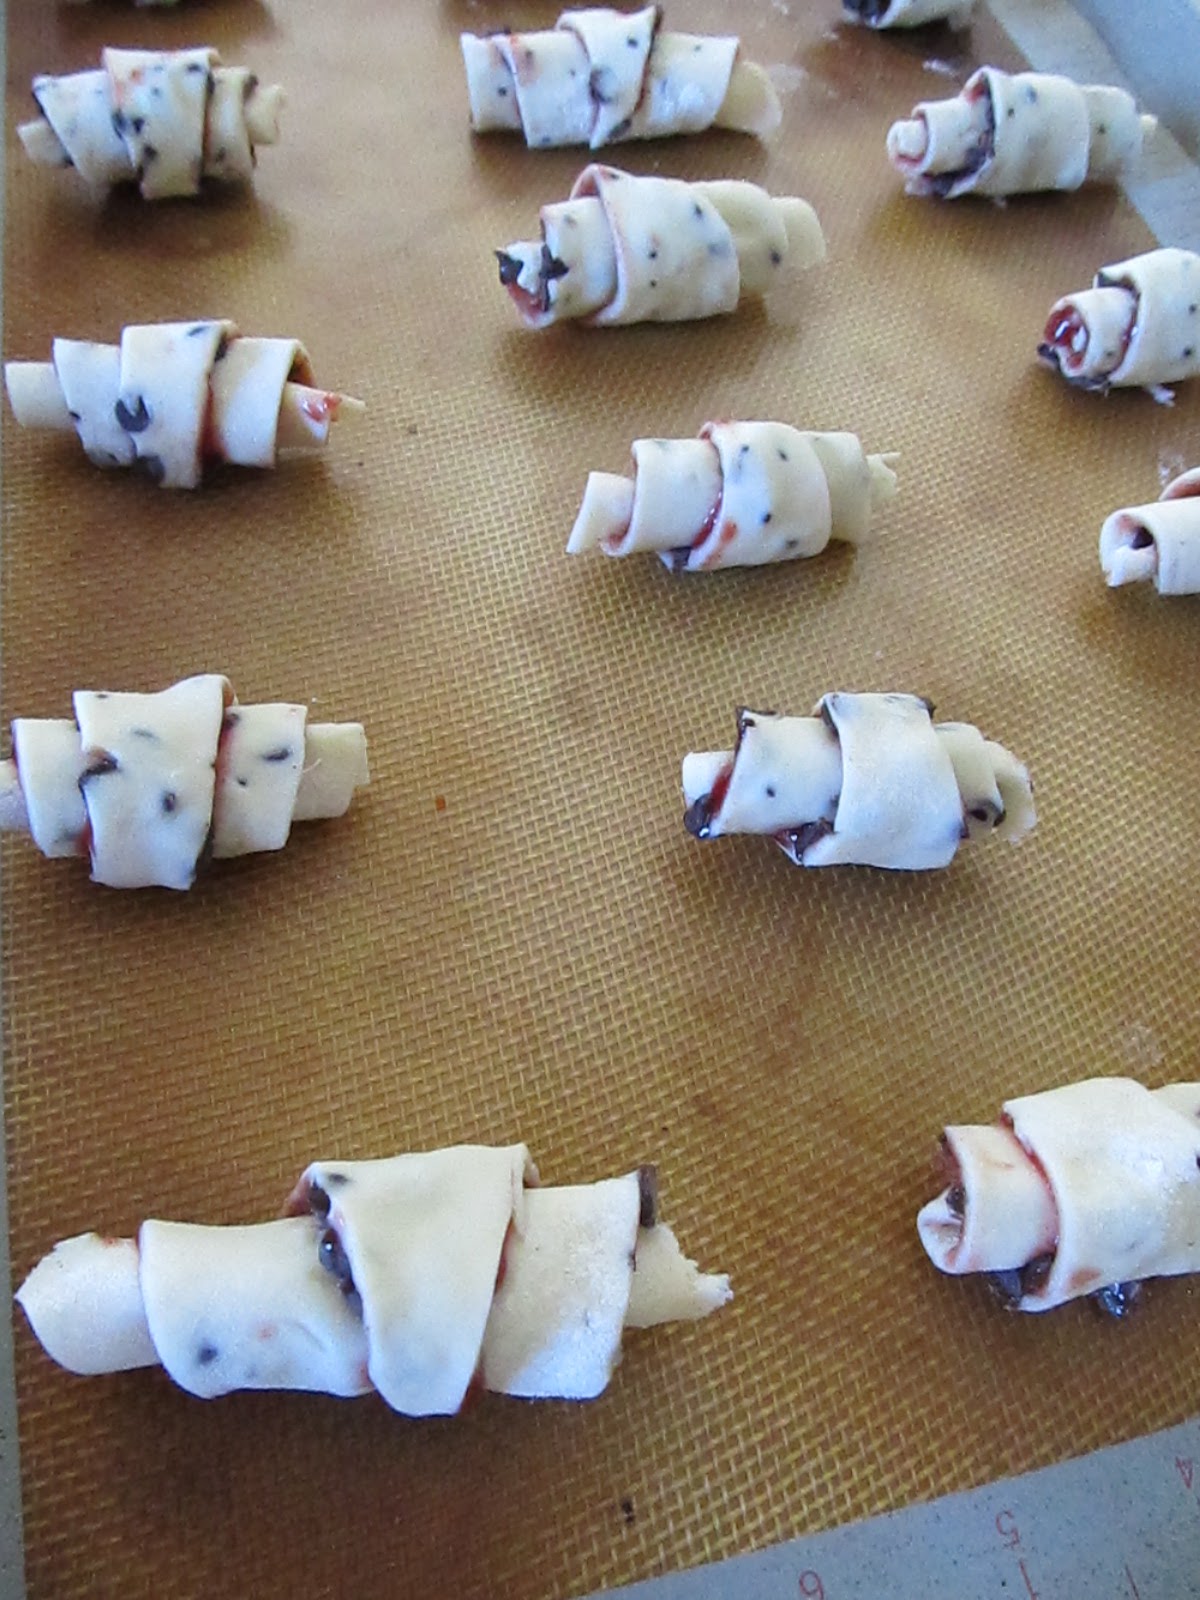
  3. To Shape the Cookies:
    1. Pull one packet of dough from the refrigerator. If it is too firm to roll easily, either leave it on the counter for about 10 minutes or give it a few bashes with your rolling pin.
    2. On a lightly floured surface, roll the dough into a 11- to 12-inch circle. Spoon (or brush) a thin gloss of jam over the dough, and sprinkle over half of the cinnamon sugar. Scatter over half of the nuts, half of the currants and half of the chopped chocolate. Cover the filling with a piece of wax paper and gently press the filling into the dough, then remove the paper and save it for the next batch.
    3. Using a pizza wheel or a sharp knife, cut the dough into 16 wedges, or triangles. (The easiest way to do this is to cut the dough into quarters, then to cut each quarter into 4 triangles.) Starting at the base of each triangle, roll the dough up so that each cookie becomes a little crescent. Arrange the roll-ups on one baking sheet, making sure the points are tucked under the cookies, and refrigerate. Repeat with the second packet of dough, and refrigerate the cookies for at least 30 minutes before baking. (The cookies can be covered and refrigerated overnight or frozen for up to 2 months; don't defrost before baking, just add a couple of extra minutes to the baking time.)
  4. Getting Ready to Bake:
    1. Position the racks to divide the oven into thirds and preheat the oven to 350 degrees F.
  5. To Glaze:
    1. Stir the egg and water together, and brush a bit of this glaze over each rugelach. Sprinkle the cookies with the sugar.
    2. Bake the cookies for 20 to 25 minutes, rotating the sheets from top to bottom and front to back at the midway point, until they are puffed and golden. Transfer the cookies to racks to cool to just warm or to room temperature.
Serving: Tea is traditional, but we drink coffee with rugelach. These are pretty and, even with their jam-and-fruit filling, not overly sweet, and they are even good with sparkling wine. Storing: The cookies can be kept covered at room temperature for up to 3 days or wrapped airtight and frozen for up to 2 months.


For the whole story on Dorie's rugelach:
http://www.epicurious.com/recipes/food/views/rugelach-51127400
For the Bourbon Cherries recipe (Substitute bourbon for vanilla vodka and add 2 more tablespoons of sugar):
 http://notesfromvalskitchen.blogspot.com/2015/12/naughty-cherries.html


Wednesday, December 2, 2015

Naughty Cherries

 "Candy is dandy but liquor is quicker"  -Ogden Nash


Just in time to kick off the holiday season, I came across a recipe for  Bourbon Cherries in the December 2015 issue of O Magazine. I immediately thought of my friend, Molly who enjoys a good bourbon and ginger cocktail preferably garnished with 2-3 maraschino cherries and a splash of the red liquid to "beautify" her drink.  I love the idea of steeping the cherries with ginger and bourbon in a mason jar and knew that this would make a great gift for her and her foodie, DIY food project, obsessed husband. I have hers stashed and ready to be delivered along with some other festive treats to be shared in another post.  However, as much as I like this plan for Molly, I'm not so keen on the heavy taste of bourbon and the fact that it practically gives me a headache before I'm even finished with my drink.  Also, I had another booze fan in mind: my sister. She has recently denounced red wine as it makes her stomach ache and has instead reached for the vodka, in particular, vanilla flavored vodka.  So, along with the batch of "Bourbon Cherries", I quickly whipped up some with vodka instead and for lack of a better name, have dubbed them "Naughty Cherries" because of what happened after I gifted my sister a jar full on Thanksgiving day.
It all began innocently enough.  She created a simple cocktail made with the vanilla vodka and a cherry for garnish.  Then she took the rest of the fancy fruit home and ate a few of the booze steeped cherries for a late night snack.  On Friday, after she plowed through the day wrought with shopping excursions and crowd battling in a few big box stores, I received a text:
"I might have a few cherries for lunch"
Hmmmm.
Still later that same day, closer to 8:00pm:
 "I am having cherries for dessert with my cocktail"
Well at least she is getting her fiber and vitamins along with these liquid based meals. She then proceeded to devour the rest of the  cherries by the end of Saturday.  On Sunday, I got another text update:
 "I just took two big swings (I think she meant swigs) right out of that cherry jar."  Nice.  "I feel like that would be a really great after dinner apertif" 
 "It was AWESOME"

  “I wish I could drink like a lady / I can take one or two at the most / Three and I'm under the table / Four and I'm under the host” -Dorothy Parker


Naughty Cherries
(makes one pint jar)


1 heaping cup of frozen (pitted) cherries  
1 sprig fresh rosemary
1 cup vanilla vodka
1 tablespoon sugar
1 (1") knob of ginger, peeled and thickly sliced

Place cherries in a resealable 1-pint jar. Push rosemary alongside cherries in jar.
In a medium sized sauce pan, bring vanilla vodka, sugar and ginger to a simmer over medium- low heat and cook until sugar dissolves, about 3-5 minutes.
Pour mixture into jar of cherries, seal and refrigerate for at least 3 days to steep.  Cherries will keep in refrigerator for up to 2 weeks. 

 And....just in time to soften the edges on the madness that takes over in December (or anytime of
 year, for that matter):


Karyn's Cherry Spice Drop
(makes 2 cocktails)


For the glass rim:
1 teaspoon cinnamon
3/4 teaspoon sugar
1/2 teaspoon nutmeg

For the cocktail:
3oz liquid from Naughty Cherries
1 oz vanilla vodka
(or any combination of the above to make 4 oz.)

For the garnish:
2 Naughty Cherries 
2 pieces candied ginger 
2 small sprigs fresh rosemary

Combine rim spices.  Wet 2 martini glasses and gently press wet edge into spice mixture. Set aside glasses.
In a shaker combine Naughty Cherry liquid and vodka over 1 cup of ice.  Shake vigorously until your fingertips stick to the metal of the shaker.  Pour mixture into rimmed glasses.
Poke one piece of candied ginger onto end of one sprig of rosemary.  Top with one Naughty Cherry.  Repeat for second garnish.  Place a garnish into each drink. Enjoy.


Monday, November 30, 2015

Post Thanksgiving Sandwich Obsession


"Is it done, yet?"

I do love the turkey sliced warm right off the bird, white meat only, please with a dollop of Val's gravy.  I'll take a little mashed potato and corn to be polite.  But what I really want is some doctored up cranberry sauce and heap of stuffing.  If there is bread or a dinner roll, I'll take that, too.
On Thursday, I'm really just waiting.  Biding my time until the next day when all of the fixings and the turkey are waiting chilled in my refrigerator.  I am imagining and planning what lies ahead:  a mile high sandwich made from the Thanksgiving dinner leftovers that I will devour in the privacy of my own kitchen on Friday.
Of course a sandwich that has been anticipated for an entire year must be constructed on just the right bread.  I demand Pepperidge Farm Jewish Pumpernickel.  I don't recall why, but it's what I crave.  The first step is to toast 2 slices just enough to give the slightly spongy textured bread some strength to give it some sturdiness for the job that lies ahead.  To begin, a slather of mayonnaise, not just any mayo, please,  Hellman's Real Mayonnaise ONLY will do.  Spread just enough on each slice of bread to create a glue for the rest of the ingredients.  Next, a thick slab of cold stuffing on one slice.  Top the stuffing with quite a few spoonfuls of cranberry sauce but not so much that the sandwich might become soggy half way through the anticipated eating experience.  Layer on as much white meat (thinly sliced and don't even think of sneaking ANY dark meat) as humanly possible to pile up without any pieces falling off to the side before I can top the whole post Thanksgiving food mountain with a generous sprinkling of sea salt and black pepper then cover with the other slice of already mayo'ed  pumpernickel bread.  Gently cut this beauty in half with the sharpest knife in the house and reverently place it on a plate.  A cold glass of milk is the ideal accompaniment.  I want chips (Wise was the brand from my childhood before Cape Cod Chips came along and stole the show.) but I know that will push my stomach's capacity right over the edge.  As it is, I should never have eaten the leftover piece of Kentucky Bourbon Pie I managed to smuggle home and keep a secret for only myself to eat in the wee hours before everyone else woke up this morning.
This sandwich is so good not only because of each ingredient expertly prepared by Val and squirreled away by me but also because it represents a moment in time.  This particular Friday with this exact meal represents the hinge between restful, restorative Thanksgiving and the rushing madness of the Christmas season. The calm before the storm of shopping for and wrapping gifts, checking lists, being here, going there.  Decorating, obligations, chorus concerts and craft fairs.  But I won't think about that right now.  In this moment, all I need is the remote, my pink down filled blanket and some retro Holiday programming to get me in the spirit of the season.

Wednesday, November 25, 2015

Oranges and Chocolate


Oranges and the "Holidays" have always gone hand in hand for me.  There is something about the smell of the citrus, the burst of essence inhaled as I peel open a naval orange and shove my thumbs into the center of the fruit to pull apart the sections one by one, biting into them, and savoring the sweet/tart juice.  I always hoped that Santa brought me the big fat orange instead of the shiny red delicious apple or the dull green pear.  Santa always put fruit in the toe of each of our stockings back then. It was a welcome tradition to reach into the long, knit sock to pull out the fresh fruit, my fingers already knowing by touch which one I would get.
Around the time I was ten years old, at Girl Scout meetings, we crafted hand made gifts to give to our parents.  (Now everyone calls them DIY and puts photos of their accomplishments on Pinterest.)  We sang Christmas carols and drank Hawaiian Punch as we labored over studding every inch of an orange with whole cloves and wrapping it with a strand of green velvet ribbon that was pinned into place so that the lucky recipient could hang the old fashioned air freshener in his or her closet. 
A few years ago, I transformed my mother's Christmas Braid Bread recipe by substituting candied orange peel and chocolate chips for the chopped mixture of candied fruit and raisins that the recipe normally calls for. I always plucked out the red, green and yellow fruit "candy" leaving behind only the raisins which drove Val mad, that candied fruit was not cheap! But the sweet dough, is a perfect vehicle for the two flavors that I always associate with Christmas and December: chocolate and oranges.  I crave the contrast of intense flavor of the dark chocolate with the brightness of orange and the combination feels to me like cause to celebrate no matter what day or season.
Perhaps for the reason of needing something, anything, to celebrate during the ridiculously long winter of 2014-2015, I resorted to dehydrating all sorts of citrus and other fruits and then decorating them with melted chocolate and an assortment of other items such as sea salt, etc.  This resulted in an excellent way to use up the oranges and other fruits that my children refused to eat and left to slowly dry out on the kitchen counter.  This drives me insane, the wasting of fruit (and food, in general), so I confiscated just about all of it, sliced it thin with my sharpest knife and put  it all in the food dehydrator that I often forget I own until I pull it out and begin again to dry everything I can find until the project becomes dull again. Regardless, the result is chewy intense, sweet/bitter orange slathered in a coat of dark chocolate.  The perfect snack for on the go and packaged into a small cello bag and tied with a ribbon, makes for an excellent hostess gift.  Also, to my delight, I've just recently discovered, they are an excellent accompaniment to a chilled glass of Chardonnay.  Next, I'm looking forward to trying them with Champagne, because of course, everything goes well with bubbly.   Cheers!


For my variation on Val's Christmas Braid Bread see:
 http://www.valscapecodkitchen.com/  News: Fruits of Christmas Past, December 2012

For other great ideas for things to dip in chocolate:
http://notwithoutsalt.com/a-plate-of-chocolate-dipped-things/

Sunday, November 8, 2015

"Book Club"

It felt like I was driving on an endless road, traveling through the woods in the pitch black night.  In reality, it was only about 7:00pm but after daylight savings time in November.  Around here, small neighborhoods nestled in areas where mostly summer residents live during the height of the season (June through August) seem like ghost towns.  I finally reached my destination after following winding Shore Road for a good 15 minutes.  The unassuming house was lit up from the inside.  At first, I couldn't figure out which way to enter. As I mentioned, it was completely dark out and there was no clear front door, walkway or any other markers to indicate how to properly get inside. I sat in my car for a moment, surveying the situation.  I reached for my hostess offering and decided to leave the wine I brought in the car, unsure of the type of occasion.  Possibly this was meant to be a tea drinking night? 
Deb appeared in the dim light from the slider on the bottom floor, she walked toward me as I emerged from my car.
"Hello!  Welcome!"
I love that she came out to greet me and guide me inside.  After all this isn't even her home.  But she instinctively knows I have no idea where I am or what to do. 
In the bright, inviting kitchen, Sheila was busy pouring the usual chilled Kendall- Jackson shared by her and Deb at just about every gathering they attend.  Besties since high school.  They usually ride together, too.  What was I thinking?  Of course this is a wine occasion! 
"O.K. before we get started I want to show Andrea around.  And I want to show you my artwork!"  Melissa was excited to have us there, to show us the hard work that she and Jamie have put into their funky, eclectic place.  Every knob on the cabinet, every piece of wood on the stairs and tile in the bathroom, carefully chosen then installed by their own hands.  Their work was impressive, the style unique.  I coveted it all, feeling my own home to be overly simple and badly in need of a fresh paint job.  Melissa's art work, the stitching and sewing and everything else she created looked effortless and masterful at the same time like only someone with true talent can produce.
And then there was cake.
Not just any cake.  This was the cake recipe from the book we had all read. " Book Club" was the excuse, the reason we had forcibly gathered ourselves together.  It is always a challenge with work schedules, kids' activities and Melissa getting ready to head to CA, back to work in less than 2 days.  But somehow she managed to bake the cake from Ruth Reichl's novel, "Delicious".  Using mortar and pestle to grind the ridiculously long list of whole spices the recipe described.  (I would have never had the patience.) Substituting a gluten free flour blend for AP and dirtying numerous bowls to produce the final result: an incredibly moist, light, slightly spiced cake with an orange and bourbon glaze.  Sublime.  Excellent with the pinot noir I later retrieved out of my car.
Sure we discussed the book...Deb tried to get us on track.  But like most conversations that involve wine and cake, the topic continually changed from the original idea to future books, Melissa's plans once back in LA, soccer games, drama at school and other stuff.  Then we toured the house again, while Melissa described the future transformation of the remaining unfinished rooms.  Two hours can pass so quickly.  Weeks and months go by before we manage to pull off another gathering of just us: no kids, husbands or other people to interrupt our intimate talk of plans, ideas, dreams.  We need to get another date on the calendar now for our next "Book Club".


I brought these cookies for Melissa. I discovered the recipe in the January 2014 issue of
Bon Appetit  and made them for my sister who also stays away from gluten. They remain soft for about 2 days then get a bit crumbly.  The deep, rich chocolate flavor goes great with a cup of tea, if you prefer and is especially decadent with a glass of  red wine.


Adapted from Bon Appetit  January 2014
Chocolate Brownie Cookies
(makes about 24 cookies)
3 cups gluten free powdered sugar
3/4 cups unsweetened cocoa powder
1 teaspoon kosher salt
2 large egg whites
1 large egg
4 oz. bittersweet chocolate, chopped
3 tablespoons mini chips 
1 teaspoon instant coffee
Place racks in lower and upper thirds of oven; preheat to 350 degrees.  Whisk powdered sugar, cocoa powder and salt in a large bowl, then whisk in egg whites and egg.  Fold in chocolate, mini chips and instant coffee.  Spoon batter by the tablespoon onto parchment lined baking sheets, spacing 2" apart.
Bake, rotating sheets once, until cookies are puffed, cracked and set just around the edges, for about 14 minutes.
Transfer baking sheets to wire racks and let cookies cool on pan for at least 5 minutes. (They will firm up.)  Once set and cooled, the cookies will peel right off the parchment.  Store in airtight container at room temperature or devour immediately.

Thursday, October 29, 2015

Legendary Lemon Cake


Here's the story as told to me: Mrs. Evelyn Stearns baked numerous cakes from this recipe for a prominent restaurant in town as well as created quite a business selling them to hostesses to serve at baby showers and late afternoon teas.  The cakes were incredibly popular.  Ridiculously moist, lemon Bundt cake with a sugary lemon glaze that added to the sweet/tartness.  Each slice held together well enough that perfect ladies could pick it up to eat it without having it fall to the plate in a crumbled mass after the first bite.  Legend has it that many asked her for the recipe but Mrs. Evelyn Stearns NEVER gave it away.
In later years, long after Mrs. Stearns no longer produced her famous lemon cake for the masses, a similar type of cake was discovered to be featured on the side of the box mix for Duncan Hines lemon cake mix.  However, in the photo that accompanies the cake mix version of the recipe, the cake appears to have more of a frosting than a glaze.  Hmmm.  After a bit of sleuthing, and prodding my grandmother, Edie, woman about town to reach out to some of her "contacts" (ladies who lunch and were clearly in the know), somehow Val came up with the famous recipe.  To this day, Val still has the recipe card in her file labeled, "Evelyn Stearns' Lemon Cake".  I now open the vault and share it with you, although it isn't much of a secret anymore.  And to Mrs. Stearns' credit, it is not the exact same recipe.  She adds an extra egg and turns the temperature of the oven down 25 degrees. Once the cake cooled for many hours, she slathered it with her signature glaze then wrapped it up tight in plastic wrap to seal it all in.  So, the recipe is decidedly hers.  After all, isn't that what we all do when we create something of our own?  Take an idea, riff on it, add this, subtract that and produce something that is entirely new but comfortingly familiar? Legendary, indeed.


Evelyn Stearns' Lemon Cake
makes one Bundt cake
 
1 package Duncan Hines Lemon Supreme Cake Mix
1 package Jello Instant Lemon Pudding Mix
5 eggs
1/2 cup vegetable oil
1 cup cold water
 
 
Preheat oven to 325 degrees.
Grease and flour a fluted cake pan.
Combine all ingredients in a stand mixer and beat well for 5 minutes.  Pour into prepared cake pan.  Bake for 55 minutes or until a pick inserted comes out clean.  Let rest on wire rack for 5 minutes.  Remove cake from pan onto wire rack and allow to cool for 4-6 hours more. 
 
Glaze:
2 cups confectioner's sugar, sifted
juice from one lemon
 
Combine sugar and lemon juice.  Wisk until smooth.  Place cake on a large piece of plastic wrap.  Pour glaze over cake and  wrap tight.  Let glaze absorb into cake for a few hours before serving.


Speaking of  tweaking, here's my own personal riff on Mrs. Stearns' cake.  Since I prefer my frosting to be the type you can actually peel off with your fork and I absolutely love a particular lemon cake featured at Starbuck's, I created a frosting instead of a glaze.  You can take your pick and adorn your lemon cake however you like.


Tart Lemon Frosting
frosts one Bundt cake
 
2 cups confectioner's sugar, sifted
1 tablespoon butter, softened
zest from 1/2 lemon
2-3 teaspoons lemon juice
hot water, if needed
 
Sift sugar into mixing bowl.  Blend in softened butter.  Add zest and lemon juice.  Combine to create a thick frosting that is barely spreadable.  If the frosting is too thick, add more lemon juice or hot water, one teaspoon at a time and mixing thoroughly after each addition as not to create a frosting that is too runny.  Dollop frosting on top of cake and gently spread with frosting knife just over top of cake allowing for frosting to gently slip down the sides of cake, leaving approximately 1 inch at the bottom of the cake exposed.  Allow frosting to set at least one hour before serving.


Thursday, October 15, 2015

Plenty of Time for Cinnamon Rolls


Last weekend was the slowest one I have had in a long time.  When life is hectic and fast, I don't realize how much I miss all of the great things that go along with having a little extra time.  Sleeping late, drinking coffee in my pajamas while sitting on the loveseat in my office and perusing a cookbook.  Writing shopping lists, planning a menu that may or may not ever come to fruition. But who cares?  The fun part is putting it all together and imagining what delicious food I could be eating by later on in the afternoon, if I'm actually motivated enough to make any of the recipes that I tore out of some back issue of Food & Wine that I'm finally getting around to reading.  I have been dying to bake some serious bread described in The Little French Bakery Cookbook by Susan M. Holding. I was tempted by the "Spicy Round Cheese Bread" with it's crusty cheese on the outside and herby tang on the inside.  I imagined toasting a slice or two or thee and slathering it with butter but realized after snuggling up in a blanket while the cool fall air came in through the window that what I really wanted is a freshly baked batch of  ooey, gooey "Big Fluffy Cinnamon Rolls".

These cinnamon rolls are serious.  They are ridiculously buttery, in the best possible way.  Which means, the amount of butter (only 2/3 cup, so don't sweat it.) in the dough allows the cinnamon rolls to remain soft and springy even after they have cooled, even a few days later when I am shoving the last small end into my mouth before one of the kids gets off the school bus and tries to claim it for her own.  The frosting is literally "THE Frosting".  Whenever anyone describes something that adds to an already amazing idea, plan, gift, outfit, whatever, they refer to it as, "the frosting" .  So, when I tell you that the "Cinnamon Roll Icing" is amazingly rich, sweet and tangy, those words just don't do it justice.  I think I will write Ms. Holding and suggest she change the name of her icing to THE FROSTING.  All caps.  It's really that good.

The process to prepare and bake the cinnamon rolls was a lengthy one.  Not hours spent toiling in the kitchen but of steps that must be performed so that the final product comes out correctly.  And waiting patiently between those steps for the right amount of yeasty activity to take place.  But it's all totally worth it.  I forgot to take the eggs out the night before but managed at least to get them to room temperature with the rest of ingredients, as suggested, by submerging them in a bowl of hot water for a little while.  Once I mixed all of the ingredients together, I began the kneading which took me a good 20 minutes.  Until reading this book, I had never heard of a "gluten-window".  To find out if your dough has been kneaded enough, rip of a piece the size of a golf ball.  Flatten it between your palms, then pull it to make it think enough so that you can see the light coming through it.  If it tares, it's not ready.  Keep kneading, and kneading and kneading some more.  Try the gluten-window test again.  Still no luck?  Keep kneading.  I kept kneading until my arms were about to fall off.  Finally the light shone through the little gluten-window and upon me. Phew! 

1 1/2 hours later, once the dough doubled in size, Ava became interested in my project.  I rolled out the dough probably into a much larger rectangle than the directions described.  I couldn't help myself, imagining how many cinnamon rolls I could eventually be devouring. Gluttonous! By the time we coated it in melted butter,  sprinkled on the cinnamon and sugar and gently rolled it into a long log, the dough measured about three feet!  I also sliced it thinner than instructed.  I really don't know why. That's how I ended up with 24 rolls instead of 12 to 15.  Ava and I kept reaching for yet another pan to accommodate them all. Finally, after nestling each roll into a butter, cinnamon and sugar bath alongside it's brothers and sisters, we wrapped the pans up for the last rise.


While the rolls baked, the centers pushed up and out forming doughy mountain peaks and some were even perfectly stepped like little cinnamon Mayan temples.  By the time they came out of the oven, none of us could resist the smell of them.  The cream cheese frosting with it's crazy amounts of even more butter is the perfect compliment (2 sticks this time, but don't skimp on it or you'll be sorry.  How often do you actually make cinnamon rolls, anyway?) We blobbed it on top of the warm cinnamon rolls and allowed it to slowly melt and drip along the sides.  Since I began this endeavor around 7:00am, the whole thing took until about 12:30pm.  Just in time for the perfect holiday lunch. The kids couldn't believe that I didn't at least make them have some fruit first.  They used their little fingers to pull apart the sticky rolled sweet and popped globs of frosting into their mouths.  I watched as they both absentmindedly wiped their hands on a shirt or a pair of pants.  "GET A NAPKIN!" I yelled.  But it was to late and I really didn't care, anyway.


For more on The Little French Bakery or to get yourself a cookbook so that you can drool over all the deliciousness on each page, go to: http://littlefrenchbakery.com/

Saturday, September 12, 2015

Labor Day, Tomatoes and Mexican Dip

     On Labor Day, I feel a need to mark the end of summer.  Draw a line in the beach sand defining the beginning of the school year, going back to schedules, buses, homework and after school activities.  This is not just for the kids.  It gets me back on track, too.  Time to focus more on organization, paying bills on time, vacuuming and family meals.  When I was a child, my grandmother, Edie usually held the "holiday" cookouts at her house in Greengate, an upscale neighborhood a short walk from Main Street in town.  Labor Day was one of those annual events that often was celebrated in this fashion with hamburgers and hotdogs on the charcoal grill, that my mother or one of my aunts ended up cooking for hungry mouths while the adults enjoyed a vodka cocktail or two accompanied by Triscuits topped with  hot pink and orange colored port wine cheddar cheese.  So, in that tradition, I gathered family together to commemorate the beginning of school and the end to so much fun we had this summer.
    I am also obsessed with tomatoes at this time of year.  I want to be sure to eat my fill of fresh off the vine, still warm from the sun tomatoes from Val's garden.  Tomato sandwiches smeared with Hellman's on soft white bread piled so high, you have to eat them over the sink and use the dishtowel to wipe the tomato juices from your hands, wrists and elbows.  BLT's with warm bacon and Boston lettuce, chopped tomatoes drenched in Good Season's Italian Dressing.  There are recipes, too: tomato pie, salsa, fresh tomato sauce with quahogs to go over hot pasta for dinner.  But my favorite one, the one that perfectly compliments the celebratory feel of summer has always been
 "Mexican Dip".


   The story goes that my aunt Janet was introduced to it on the beach one day and brought this simple recipe to the rest of us, or something like that.  Val still has the 2.5" x 5" card written in my aunt's unmistakable handwriting so that's how I seem to remember it.  In any case, it's so easy, I no longer need to consult the written instructions.  Also, I recall, we used to serve it with Doritoes as true "Mexican" style food had yet to make it's way to Cape Cod.  Basic tortilla chips were not available in the supermarket.  Serve it with whatever chips you want.  But be warned: this dip is so delicious, hitting all the bells and whistles for hungry pre-dinner appetites, your guests will inhale it if served as an appetizer.  Before the main part of the menu was ready last Monday, I had to tell my father not to spoil his appetite: 
"Dad, this isn't the meal."  I said as I pulled the dip and chips away from him.
"No, but it could be." was his response.
It is that good.  I have been known to replace my dinner with a small batch for just myself.  When the children are watching Disney shows in the basement, I prepare a personal portion with a heaping pile of chips.  Pour a generous glass of wine and devour it all with my feet up on the ottoman while I watch some truly terrible T.V. (Real Housewives of NYC, anyone?)  Now that's a celebration.

Mexican Dip
(serves a group)
 
1/2 package taco seasoning (I use McCormick)
3/4 cup sour cream, divided
1 ripe avocado
juice from 1/2 lemon
2 dashes Tabasco sauce
salt
pepper
1 2.25 oz. can chopped black olives
1-2 medium sized ripe tomatoes
1 small onion (optional)
6 oz. cheddar cheese, shredded
tortilla chips
 
 
Combine the taco seasoning and1/2 cup sour cream. Spread over a large plate or platter.


In a small bowl, mash avocado.  Add remaining 1/4 cup sour cream, lemon juice, Tabasco and salt and pepper to taste.  Spread avocado mixture over taco seasoning mixture. 
 
 
Layer finely chopped black olives over avocado mixture.
 
Cut tomato and gently squeeze out seeds.  Dice seeded tomato and layer on top of black olives.  
 
If using, dice onion and layer on top of tomatoes. 
Top entire dip with shredded cheddar cheese. 
 
Cover and chill until ready to serve.  Can be made a few hours in advance.


Thursday, August 6, 2015

Herbivore

 I feel compelled to use it all.  Every vegetable, fruit, leaf of lettuce, if it's growing in my yard or on my deck.  If I've had a hand in helping it to survive, it must be devoured instead of left to wither on the vine.
The herbs have done very well this year, especially the potted ones.  But my own consumption can barely keep up with their bounty.  Of course, I want to employ their flavors in creative dishes when they are fresh and the flavors vibrant.  However, I have succumbed to the fact that they won't be growing like this for long and have taken measures to "preserve" them.  Hanging from the lamp over the kitchen table where I usually string up holiday decorations, are bundles of sage, oregano, rosemary and thyme in an attempt to dry them for later use.  (I'll have to report back on how well this idea actually works out.)  Other types like basil and parsley, I puree with a touch of olive oil then freeze in ice cube trays to be  used in various recipes throughout the year. In spite of my efforts or maybe because of them, these crazy plants keep producing!


My latest cookbook obsession is "Pomegranates & Pine Nuts" by Bethany Kehdy.  It's a collection of recipes based on traditional Lebanese, Moroccan and Persian dishes.  This book partly inspired this tasty dip with the addition of Greek yogurt and the layering of the components instead of stirring it all together. (Although that would be o.k.  Ava always wants to stir it all together, I just like how it looks when plated my way.)  The herb blend derives from another current obsession (of which I have many, it seems.), that began a few years ago with chimichuri sauce, as well as green harissa and gremolata (see blog post: Eat Your Vegetables with Sauce ) In this one, I have omitted the garlic for those of you with sensitive stomachs and a delicate sense of smell when it comes to dining with companions who get stinky garlic breath.

 
Garden Fresh Herb Sauce
 
1 large bunch fresh herbs such as parsley, basil or cilantro or a combination
3-4 tablespoons extra virgin olive oil
juice from 1/2 lemon
1 teaspoon red wine vinegar
1 pinch red pepper flakes
pinch of salt and black pepper, to taste
 
Remove all stems from herbs and place leaves in a Cuisinart with blade or small chopper.  Add 2-3 tablespoons olive oil, lemon juice, red wine vinegar, red pepper flakes and salt and pepper.  Puree mixture.  If leaves are not moving around, add more olive oil to loosen so that the mixture moves around in the chopper.  Once, leaves are pureed into fine pieces, adjust for taste.  Mixture can be saved in an airtight container in refrigerator for 2-3 days.
 
Lately, I have been serving this sauce over a generous dollop of Greek yogurt accompanied by my favorite dipping mechanism: Kettle Brand Krinkle Cut Potato Chips.  "Salt & Fresh Ground Pepper" is my favorite flavor.  Love it when they go on sale 2/$5.00!  This yummy dip is great with cocktails (there is not much that isn't) before or instead of dinner.  Enjoy!


Monday, July 6, 2015

Simply Divine


It began with an overflowing quart of some of the most beautiful, ruby red strawberries I have ever seen. Tiny, bursting fruit begging to be eaten tonight.  At their very peak of ripeness, warning, "Don't wait! We'll be soggy and bruised by tomorrow!"
There was also the problem with my oven.  It wasn't working.
Not to mention my utter exhaustion from working far to many hours on my feet selling t-shirts to rabid tourists all clamoring for souvenirs to commemorate their vacations on Cape Cod. For the past few weeks, I have been held hostage inside a busy shop on Main Street instead of lounging on the beach and creating concoctions in the kitchen.  It's sad, very sad.
That is why I had to resort to the simplest but by far the best method of all to enjoy these sweeties before Ava swooped into the kitchen to snatch another and another into her mouth, her fingers already stained red from their juices, revealing her thievery.
But first, I called Val to make sure she would be available to partake.  After all, I have her to blame for introducing this decadent recipe when my sister, brother and I were children.  Of course she would make a stop over after a long day of painting the trim on her house, her arms smeared with green paint, her body exhausted, she would not miss enjoying this treat that truly comes but once a year. As it can only be reproduced with the finest, local, fresh and sweet berries, the kind that are as deep red on the inside as they are on their surface.  The window of opportunity is short especially this year as many strawberry crops in the area were hampered by the rough snowy winter of 2015.
Val arrived as I cleared away the dinner dishes and placed small glass bowls on the table.  We sliced the berries into each dish and sprinkled them with sugar.  Next, each portion received a splash of cold, heavy cream.  We ate the soft berries floating in their rich bath in silence only to pause to add a bit more sugar or cream to taste. 
I realized in that moment, it all works out: the oven, the job, the moment I happened upon the strawberries at the farmers' market that very afternoon.  It all came to together.  The simplest of desserts.  The simplest moment.  Divine.

Thursday, June 4, 2015

Bread Battle


There is always a potential battle waiting to be waged over a freshly baked loaf of Val's homemade bread.  The kids want at least two slices at breakfast smothered in butter.  Then they want it for a snack and request to have it instead of dinner.  When I see what is left of the whole loaf that my mother had just gifted to me hours ago, I search their faces accusingly while Rob murmurs under his breath, "I only ate a heel." Only a heel, indeed.
Val's bread is simple but it takes some patience and time to mix it, knead it, allow it to rise and knead and rise again.  She bakes it to a perfect brown on top and slices it with an expert hand.  I prefer her to slice our loaf as some people slice it way too thick, thus wasting it.  And I will admit that I can make the cuts a bit lopsided in my rush to eat it all up.
But I am going to win tonight.  No one else is home to argue over or beg and plead to eat the last remaining pieces.  I slather them with some Lemon Garlic Aioli I found in the back of the fridge. (It never lasts that long so it can't be very old.)  Top the sauce with various slices of assorted cheeses: cheddar, mozzarella and provolone and add some sliced cherry tomatoes (it's all I have), then sprinkle with sea salt and black pepper. 


The first step is to bake all this in the toaster oven.  After the cheese has melted sufficiently, I heat up my black cast-iron griddle, drop down some dollops of butter and place the open faced sandwich on top of the melting goodness. I cook the sandwich halves until golden on the outside but leave them separate instead of making a real sandwich as to prolong my consumption of the last two pieces of Val's bread.


  As for the remaining heel that was left in the bag?  I ate it smothered with aioli and fresh basil as I created my masterpiece.  Oh yeah, when they all get home and ask for toast with no regard to their mother's/wife's needs, they will know.  There is going to be one hell of a fight tonight.

Thursday, May 21, 2015

French Breakfast

The Falmouth Farmers' Market opened for the season today in it's new location at Marina Park.  There was a nervous excitement in the air as all of  the vendors and board members who make the market happen were a bit nervous about having to move the market from it's original spot on Main Street.  But the majority feeling amongst the shoppers who were there at the opening bell was one of optimism as the new site is more spacious and likely easier for access and parking during the madness of the summer months.  Aside from all of this, I was there to check out the goods.
My first stop was at Rein's Real Baking as I spotted what looked like a chocolate filled chocolate whoopee pie in the pastry case.  Indeed it was, and I purchased one immediately to quell my growling stomach. I can never just walk by Carrie's set up for Peach Tree Circle Farm.  Her style, quality of produce as well as interesting flavors of jams and jellies cannot be compared.  Plus, it's fun to chat with her.  Once I spotted the tiny fresh radishes, only $1.00 for a bunch, I knew what I was going to have for lunch today: tartine with sliced radishes, sweet butter and a generous pinch of sea salt.  I informed her of my plan.
"Well, then you will have to buy the French Breakfast radishes."  she said.  SOLD.
As I made my way along the tents of homemade soaps, Italian olive oil and local cheeses, (I'll be back next week for some cloumage from the Shy Brother's Farm) to procure a baguette on which to smear butter and layer on radish slices, I got sidetracked at Westport Rivers Vineyard.  How can I say "No." to a sample to go along with the chocolate whoopee pie I was shoving into my mouth?  The port style wine was divine but I had my eye on the quirky label on the bottle of Farmer's Fizz.  This estate grown proseco style wine is slightly sweet and bubbly with notes of fresh peach...out of this world and likely a great way to end a hot summer day after spending time at the beach.  Of course, I bought a bottle!
I cashed in my last $2.50 for a demi baguette from Pain d'Avignon and bid good-by to some of my friends on the Falmouth Farmers' Market board who were hard at work trying to duct tape the market sign to the information table.  I explained I had to fly home and eat my intended lunch as I devoured the last bite of my chocolate treat.  As I got into my car, I noticed most of the parking spaces were taken and many more eager shoppers out on the lawn, talking with farmers, so glad that springtime and the market have arrived once again.


I am completely lazy when it comes to making my radish tartine.  However if you are a bit more ambitious, check out Falmouth Farmer's Market board member, Patricia Gadsby's recipe for making homemade scallion herb butter.  Her sandwich is more elaborate and sounds utterly delectable.  If you decide to make it, invite me over for lunch.
http://www.capenews.net/falmouth/briefs/falmouth-farmers-market---may/article_a94cf806-fe44-11e4-985c-dbb0fc10ebe1.html

 
Super Easy Radish Tartine for Lazy People
Serves 2
 
1 fresh demi baguette (4 slices cut on an angle)
2 tablespoons unsalted butter, softened
4-5 small fresh radishes
sea salt
 
Slice 4 thin slices off the baguette on an angle to create as much surface area for the butter as possible.  Smear a generous amount of butter on each slice of bread.  Thinly slice the radishes and arrange in one layer over the buttered bread.  Generously sprinkle radish layer with sea salt. Enjoy immediately. 


"YES!" Woman

http://www.amazon.com/Kids-Cooking-Club-Summer-Culinary/dp/1460995155/ref=sr_1_1?s=books&ie=UTF8&qid=1432117999&sr=1-1&keywords=kids+culinary+camp

I've finally finished putting all the recipes from the Kids' Culinary Camp into a book available for purchase on amazon.com.  These are the recipes I developed for the cooking camp I taught for 3 weeks along with my sister, Karyn's assistance back in the summer of 2012.  Evidence of yet another situation I got myself into by saying, "YES!" before I really knew what it was all about.
I was asked in February of 2012 by the woman who runs the culinary program at Highfield Hall if I would take on the kids' summer program.  Before I thought about it, before I formulated even one question, a loud "YES!" came out of my mouth.  I clearly wasn't thinking at all during that long, cold snowy winter because I also had previously agreed to take on a gourmet to-go food business with someone I knew from my days at Falmouth High.  I didn't inquire about any details on that offer either before I dove in head first.
Anyone who really knows me, understands that I am in my most vulnerable state of mind in February.  According to my good friend, Deb, I am always coming up with new businesses and wild ideas in the shortest, yet most brutal month of the year.  She and many members of my family try and detour me from accepting any tasks, volunteering positions, jobs or new business ventures until my head is clear, usually by the end of April when the sun is shining on a more consistent basis and I can get outside to eradicate any cobwebs and pie in the sky ideas that have taken up residence in my brain during the cabin fever inducing winter season.
While the camp was fun, I did throw out my back in week two likely due to the stress of it all.  The recipes were a huge hit, that is why I decided to actually publish them in a book.  The kids were great and willing to attempt new foods likely because parents weren't around.  I know this because my own cherubs will likely take a bite of something I have been trying desperately to get them to eat only when they are off with another adult and then I hear later that they devoured the whole thing.  In spite of not knowing anything about the adventure that lay ahead of me, the camp was a success and I'm glad I naively said, "YES!".
Will there ever be another Kids' Culinary Camp?  I don't know. It may be a while before I come out of retirement.  Until then, follow the link to buy the book.  A culinary program in your own kitchen awaits.

Sunday, May 10, 2015

Happy Mother's Day!

This story first appeared in the monthly column I wrote for the Falmouth Bulletin entitled: "Lessons from Val's Kitchen".  It was published in May 2009.


My Every Day, Extraordinary Super Mom

I have been wracking my brain, trying to recall an event or incident that fully describes the essence of my mother, Val; one that encapsulates how extraordinary she is.  Here in lies the problem: nothing in particular comes to mind.  Nothing stands out from the rest.  Sure, she has been there to fight for me when my sophomore English teacher did not want to let me out of 10th period early enough to make an away field hockey game.  She baked countless batches of chocolate chip cookies for school parties and bake sales.  Chauffeur, prom gown seamstress, brownie troop leader, the list of sacrifices goes on and on.  Still nothing.

I recently wrote in a letter to a publisher: “So, who is Val?  She’s my mother and I wrote the [cook] book about her.  It seemed there isn’t anything she can’t do.  She refinishes furniture, makes wedding gowns and farms her own organic garden. Then she takes a break to make dinner: quahog chowder with homemade bread or barbecued chicken with a cool and creamy cucumber salad and blueberry pie for dessert.” It’s all true, pretty awesome day in and day out.   If you know Val, you can vouch for me.

In my attempt to find that “nugget” of a memory that would tell the complete story, perfectly depicting my mother’s love, I’ve come to realize that the mundane stuff, the everyday, small acts of caring, are what is the most important.  I actually had this epiphany when I was rigging up a pair of adult sized headphones for my five year old daughter to wear on her tiny head. Sometimes, tying my son’s shoes for the tenth time in one day, can grate on my nerves, still other moments I cherish as I acknowledge the swiftly passing time.   The little things I took for granted from my own childhood have formed pebble by pebble into a mountain of memories. Crisp clothes fresh from the clothes line, going to the beach every day for swimming lessons during summer vacation, even when storm clouds threatened  (“You need to learn to swim in all types of weather!”), clichéd phrases: “You’re treading on thin ice!”, a favorite meal to celebrate my birthday, it was all Val’s way to say, “I love you.”

One day in these last few years (it has all run together for me ), an elderly woman stopped me in the grocery store while I was trying to control my unruly children who both wanted to push the carriage without the help of the other one.

“The days are long but the years are short…” she said with a wistful smile.

At that moment I was thinking about how incredibly long my day had already been trying to keep Ava and Declan from killing each other.  I smiled and nodded my head in agreement.

I think of that phrase often as my children are growing up so fast.  How did Ava get to be five years old already?  How am I forty?  Where did all of those moments go?  The ones that the parenting magazines tell you to put in a scrap book or a time capsule?  Just like kids do, it’s easy for moms and dads to take mundane life for granted, too. It makes me wonder if Val ever felt frustrated and too tired to make dinner or help with homework.  That’s when it hit me.  Of course she was tired and overwhelmed and sick of explaining fractions for the umpteenth time.  The thing is, I never knew it.

I can only hope to strive to be like Val: patient and loving even when it seemed like I didn’t deserve it.  She created a consistent life where it was safe to be a little naughty and “tread on thin ice!” because I knew she would still love me.  She has always been there to pick me up when I fall down or just to lend a helping hand when I feel like I’m failing.

I just got annoyed because I had to stop writing yet again to see why my son is crying. He has been fussing all afternoon over his sister’s teasing and a toy that won’t work the way he wants it to.  As I got out of my chair and stormed over to the door in disgust, I saw that he had fallen and scraped his knee.  Real tears ran down his cheeks as he said between sobs, “I-I want my m-m-mommy!” My feelings of frustration gave way to a desire to comfort when I scooped him up and held him close to shush his sobs and wipe his tears.  He nestled his face into the crook of my neck and took a long deep breath.  Just the kind I like to do when I hug my own mother and inhale her perfume. It may not seem extraordinary to anyone else, but it is always there when I need it.


Enjoy these breads toasted and smeared with butter and jam for breakfast, served with ice cream for dessert or like Val does, alongside a cup of hot cocoa.  They are versatile and understated.  She bakes a batch and puts a few in the freezer so there is always a snack at the ready for comforting a small child’s bruised shins or an adult child’s bruised ego.

Lemon Poppy Seed Cake

(Makes 3 small loaves)

½ cup (1 stick) unsalted butter at room temperature

1 1/2 cup sugar, divided

3 eggs

2 teaspoons lemon extract

grated rind of one lemon

¼ cup poppy seeds

2 cups flour

1 cup buttermilk

1 ½ teaspoons baking powder

½ teaspoon baking soda

pinch of salt

½ cup lemon juice


Preheat oven to 350 degrees. Grease and dust with flour 3 small loaf pans (6”x3”x2”).

In a large mixing bowl, cream together butter and 1 cup sugar for two minutes, scraping down sides of bowl with a rubber spatula until light and fluffy. Add the eggs, one by one beating well after each addition. Beat in lemon rind, lemon extract and poppy seeds.

Add 1 cup flour, beat well. Add buttermilk, baking powder, baking soda and salt. Beat in remaining cup of flour until just mixed. Pour into prepared pans. Bake for 35-45 minutes until golden brown and a knife inserted comes out clean.

While loaves are baking, in a saucepan, combine ½ cup sugar and lemon juice to make syrup. Heat until sugar dissolves. Remove from heat and let rest until loaves are done cooking.

Poke small holes in top of cooked warm loaves with a toothpick. Pour syrup over top of loaves reserving a small portion of syrup for the bottom of the loaves.  Let rest for 15 minutes. Turn loaves out onto a cooling rack and brush bottoms of loaves with remaining syrup. Cool completely, slice and serve.

*Can be wrapped tightly in plastic wrap and frozen.


Holiday Cranberry Bread

(Makes 3 small loaves or one large)

2 cups flour

1 cup sugar

1 ½ teaspoons baking powder

½ teaspoon baking soda

1 teaspoon salt

grated rind and juice from one orange

2 tablespoons butter (very soft)

¾ cup boiling water

1 egg

1 ½ cups raw cranberries, cut in half by hand*

½ cup chopped walnuts


Grease 3 small loaf pans or one large one.

In a mixing bowl, sift together flour, sugar, baking powder, baking soda and salt. Set aside.

In a large mixing bowl, combine orange rind, juice, soft butter, boiling water, and egg.  Add dry ingredients, cranberries and walnuts. Mix by hand (as not to crush cranberries) until combined. Pour into prepared pans and let stand for 20 minutes. Preheat oven to 350 degrees.

Bake a large sized loaf for 60-70 minutes and the smaller loaves for 25-35 minutes until the top is golden brown and a knife inserted comes out clean. Cool on wire rack for 10 minutes and turn bread out of pan(s) back onto rack to continue cooling for at least 30 minutes.  Slice and serve.

*Val cuts each cranberry in half to reveal star pattern in the middle of the fruit. It makes a better presentation and larger chunks than chopping them in the food processor. Do what you like.


Andrea Norris lives in East Falmouth, just a few miles away from a comforting hug and a warm slice of Lemon Poppy Seed Cake. Check out her blog: http://www.notesfromvalskitchen.blogspot.com